How to Natively Schedule Organic Posts on Twitter

Did you know that Twitter houses its very own scheduling tool for users? Now you do! Most digital marketers these days use some type of social scheduling tool, and while that is perfectly acceptable (and totally encouraged), there’s nothing wrong with adding another social media tool to your utility belt – especially when it’s built in.
First and foremost, it’s important to note that you don’t need to get rid of your scheduling tools, because we all know those can be lifesavers! However, it’s great knowing that your scheduled tweets will appear exactly like the preview, which isn’t always the case on 3rd-party platforms. You’ll also be able to add Twitter Cards and videos using this method.
Check out our easy guide to learn how to use Twitter’s native scheduling platform.
Getting Started
To get started, head to www.ads.twitter.com and sign in. If you haven’t set up your account with Twitter Business, click here and get that set up first before you continue.
When you first open the platform, you will see your “Ads Dashboard”, which will show any ads that you’ve run on Twitter in the past. If you haven’t run anything, it will be empty.
Step 1:
Click on “Creatives” in the top menu bar and select “Tweets” You will be brought to your Tweet dashboard.

Step 2:
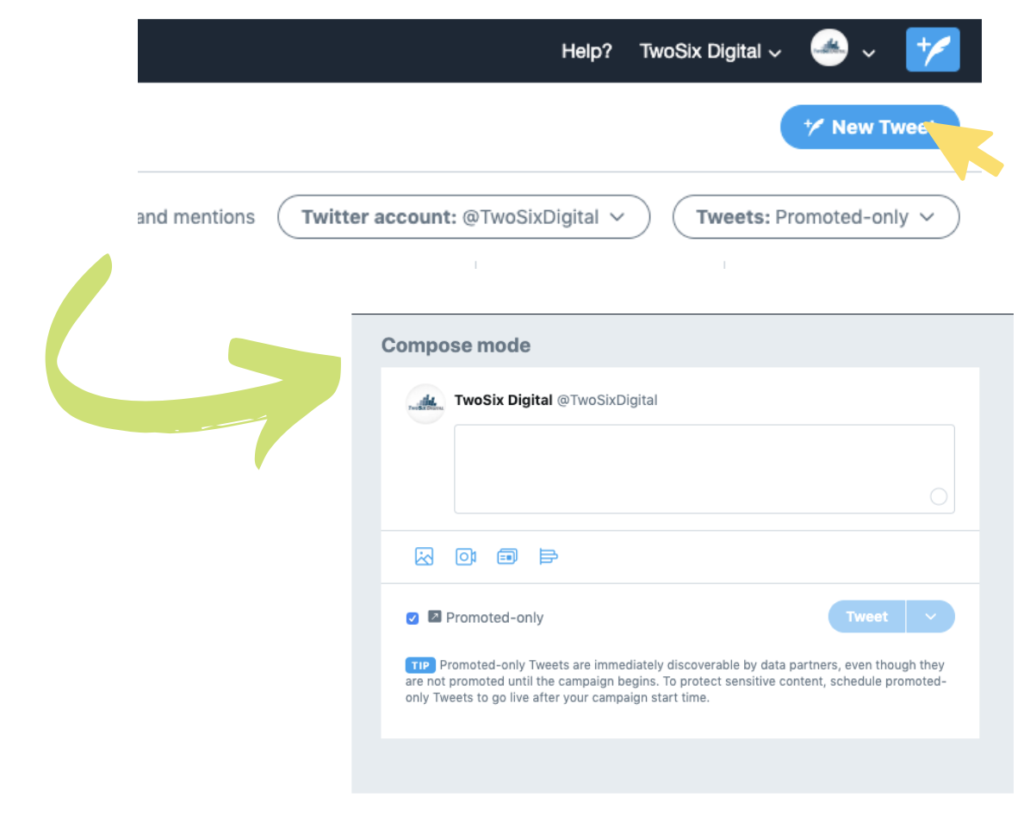
Click on the blue Tweet button in the top right corner of your screen, which will bring you to a compose dashboard.

Step 3:
Compose your Tweet and add necessary images, links, and text.

Step 4:
Un-check the “Promoted Only” Box. This is a vital step in the process. It ensures that your Tweet will post organically. If the box is checked, then Twitter will save it for an upcoming campaign and not post it publically.

Step 5:
Double check everything and click the drop down arrow next to “Tweet” and click “Schedule.” Then, choose the date and time that you want your Tweet to go live.

What’s Next?
After your Tweet is scheduled, you can click back to the Tweets manager to view it or edit it again before it goes live. You can access this dashboard by clicking “Tweets” under the creative option in the top menu bar. Here, you can choose between viewing your “Promoted-Only”, “Scheduled” “Draft” and “Organic” posts.
To view the post you just created, choose “Scheduled” in the drop-down menu.

Once your Tweet is live, you can check out the performance of it by heading to “Analytics” section of the platform or by clicking the analytics icon on the Tweet itself.

If you use Twitter every day for you your business, it is important to stay up-to-date on how to use the platform to its full potential! The more you know, the more success you’ll have. For more ways to stay updated on the latest digital marketing trends, be sure to subscribe to our newsletter and follow us across social media at the links below.


